Activityindicator Not Showing Ios Shows Once Then Never Again
Visually rich links describe beautiful imagery, typography and even video thumbnails used to preview web folio content. They're a significant upgrade from blue text, which was the only thing bachelor before iOS thirteen.

In this tutorial, you'll use the LinkPresentation framework to make links better looking, more than engaging and more user friendly. Check out this case of a video thumbnail preview:

All a web folio has to do is add together a couple of special HTML tags to specify the title, icon, image or video and voilà: Your links come up alive!
Just imagine how overnice it'll be for your messaging, weblog or recipe app to immediately prove a preview of the content the user's about to see. You'd click on the right link much faster than the left, even though they link to the same web page.

With the addition of the LinkPresentation framework, you can easily and quickly showcase links in your apps. Set up to dive in?
In this tutorial, you'll larn how to:
- Create rich links.
- Handle LinkPresentation errors.
- Store metadata.
- Optimize the share sheet.
- Relieve favorite links.
Getting Started
In this tutorial, you'll be working on an app called Raylette. Each time yous spin the wheel, Raylette randomly chooses a raywenderlich.com tutorial and presents it to y'all using the LinkPresentation framework.

Hopefully, it inspires y'all to check out a topic you might not accept come beyond otherwise!
Use the Download Materials button at the top or bottom of this tutorial to download the starter projection. Open up it and build and run. Y'all'll encounter you already accept a Spin the Wheel push button and two tabs: Spin and Saved:

Earlier you swoop into the code, though, at that place'southward a bit of theory to encompass. Then hold on tight!
Understanding Rich Links
Rich links are link previews yous see, for case, when users transport messages through the Letters app.
Depending on the information Apple can extract from the web page, a link preview can look one of these four means:

Agreement Rich Links: Spider web Page Metadata
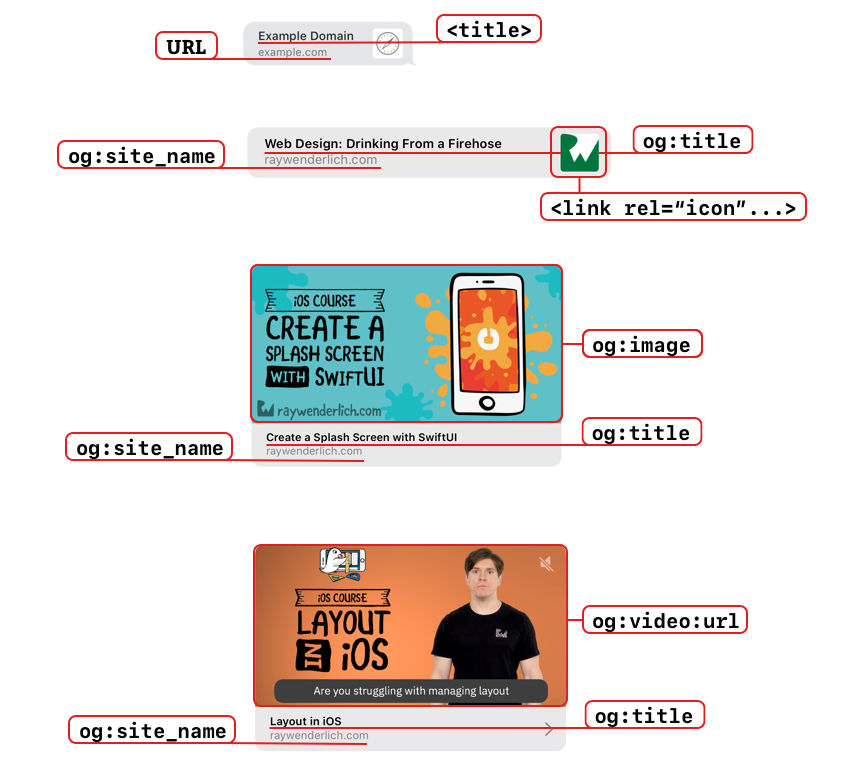
The spider web page'south metadata dictates what you'll see in the preview. Look at the tags in the <head> section. You tin do this in Chrome by right-clicking on a spider web page and choosing View Folio Source.

Here's an example for the Palpitate Hero Animations tutorial from raywenderlich.com:
<head> <title>Flutter Hero Animations | raywenderlich.com</title> <meta property="og:title" content="Flutter Hero Animations"> <meta holding="og:type" content="video.other"> <meta holding="og:image" content="https://files.betamax.raywenderlich.com/attachments/collections/222/0c45fb39-9f82-406f-9237-fc1a07a7af15.png"> <meta holding="og:description" content="<p>Acquire and understand how to apply the Hero widget in Flutter to animate cute screen transitions for your apps.</p> "> <meta property="og:site_name" content="raywenderlich.com"> <link rel="icon" type="image/png" href="/favicon.png"> ... </head> The metadata that powers rich links consists of both Open up Graph meta tags and other HTML tags. The LinkPresentation framework extracts all these tags and uses the most advisable ones.
Agreement Rich Links: Open up Graph Protocol
The Open up Graph protocol is a standard of web page meta tags for visually rich links in apps like Facebook, Twitter or Letters:

Befitting to the protocol is pretty elementary. Yous merely demand to add some special <meta> tags in the <head> of your web folio and you'll be up and running in no fourth dimension.
The <meta> tags required past the Open Graph protocol are:
- og:title: object title
- og:type: object type, for example music, video, article and many more
- og:paradigm: the object's prototype URL
- og:url: the canonical URL of the object
You tin can easily recognize the Open Graph <meta> tags by their og: prefix.
The majority of raywenderlich.com articles and video courses take code similar this. Each web page has the following tags: og:title, og:type, og:prototype, og:clarification and og:site_name.
Note: og:site_name specifies that a particular web folio is part of a larger website. In our example, it tells us Flutter Hero Animations is part of the larger raywenderlich.com website.
Check out the full specifications of the Open Graph protocol to acquire more than near how it works and what types it supports.
Building the Preview
The LinkPresentation framework extracts the metadata from all the web folio's tags and uses the most appropriate ones to display the best preview.
The preview depends on five pieces of information:
Edifice the Preview: The URL
The URL comes from either:
- The site'southward URL
-
og:site_namesimilar<meta property="og:site_name" content="raywenderlich.com">
When og:site_name is nowadays, information technology takes precedence over the URL in the link preview. All Open Graph meta tags take precedence over the other alternatives when they're present.
Edifice the Preview: The Title
The title comes from either:
-
<title>Flutter Hero Animations | raywenderlich.com</championship> -
<meta property="og:title" content="Flutter Hero Animations">
<title> specifies the title of the web page you see in the browser. But sometimes, the <title> tag duplicates the site's URL, as in this example. To avoid this duplication in your preview, use og:title instead. It will take precedence over the <championship> tag.
Apple recommends you:
- Keep titles unique and informative.
- Avoid duplicating the site proper noun in the championship.
- Don't generate tags dynamically, because the LinkPresentation framework doesn't run JavaScript.
Edifice the Preview: The Icon
The icon comes from this tag: <link rel="icon" type="epitome/png" href="/favicon.png">
Building the Preview: The Image
The paradigm comes from this tag: <meta holding="og:image" content="image.png">
Apple recommends you:
- Use images specific to your content.
- Avert adding text. Rich links appear in many sizes across multiple devices; the paradigm text might not scale.
- Specify an icon even when y'all have an paradigm, as a fallback.
Edifice the Preview: The Video
The video comes from this tag: <meta belongings="og:video:url" content="video.mp4">
Apple recommends you:
- Keep the size of the icon + image + video to 10MB or less.
- Reference video files directly, rather than YouTube links, which volition not autoplay.
- Avoid videos that require HTML or plug-ins; they are not supported.
All of these, except the URL itself, are optional. The LinkPresentation framework will e'er choose the "richest" data possible to nowadays the link preview in the all-time way. The lodge of "richness" goes from Video > Image > Icon.
And with that, you're finally set up to jump into the code!
Retrieving the Metadata
The start step to presenting rich links is to get the metadata.
In Xcode, open SpinViewController.swift. Here you'll meet a large array of raywenderlich.com tutorials, some outlets from the storyboard and several methods for you to implement.
To starting time using the LinkPresentation framework, you first have to import it. Place this at the top of the file, right beneath import UIKit:
import LinkPresentation To grab the metadata for a given URL, y'all'll utilize LPMetadataProvider. If the fetch is successful, you'll go dorsum LPLinkMetadata, which contains the URL, title, image and video links, if they be. All the properties on LPLinkMetadata are optional considering there's no guarantee the web page has them prepare.
Add a new provider property, right below the last @IBOutlet definition for errorLabel:
private var provider = LPMetadataProvider() To fetch the metadata, you'll telephone call startFetchingMetadata(for:completionHandler:) on the provider.
Locate spin(_:) and add together the following implementation:
// Select random tutorial link permit random = Int.random(in: 0..<links.count) allow randomTutorialLink = links[random] // Copy the provider provider = LPMetadataProvider() guard allow url = URL(cord: randomTutorialLink) else { render } // Start fetching metadata provider.startFetchingMetadata(for: url) { metadata, error in guard permit metadata = metadata, mistake == nil else { return } // Use the metadata impress(metadata.championship ?? "No Title") } You're probably wondering why you're recreating provider every time the user taps to spin the wheel. Well, LPMetadataProvider is a one-shot object, and then you tin but utilize an case once. If you lot try to reuse it, you'll get an exception like this:
2020-01-12 19:56:17.003615+0000 Raylette[23147:3330742] *** Terminating app due to uncaught exception 'NSGenericException', reason: 'Trying to showtime fetching on an LPMetadataProvider that has already started. LPMetadataProvider is a ane-shot object.'
But, it'southward a good idea to have a class-wide reference to it in instance you lot need to use information technology afterward in other methods.
Build and run and press the spin push a few times to brand sure the URL titles go printed to the console:

Presenting Your Links
It's no fun just printing the championship of the web page to the panel, though. The existent magic of rich links is to render them beautifully in the app!
Presenting a link is quite piece of cake. The LinkPresentation framework includes LPLinkView that does all the heavy lifting for yous.
Add a new property, right below provider:
private var linkView = LPLinkView() Each time y'all spin the bike, you'll create a new LPLinkView case with the given URL and add it to stackView. Once you fetch the metadata for that particular URL, you'll add it to linkView.
Supersede the current implementation of spin(_:) with the code beneath:
let random = Int.random(in: 0..<links.count) allow randomTutorialLink = links[random] provider = LPMetadataProvider() // 1 linkView.removeFromSuperview() guard let url = URL(cord: randomTutorialLink) else { return } // 2 linkView = LPLinkView(url: url) provider.startFetchingMetadata(for: url) { metadata, error in guard let metadata = metadata, error == nil else { return } // 3 DispatchQueue.principal.async { [weak cocky] in // 4 baby-sit allow self = self else { return } self.linkView.metadata = metadata } } // 5 stackView.insertArrangedSubview(linkView, at: 0) In the code above, you:
- Remove
linkViewfromstackView, if information technology's already at that place. You only want to present one link at a time. - Initialize
linkViewwith just the URL so while yous're fetching the metadata, the user will still see something displayed. - Assign the metadata to
linkView. Then you employDispatchQueueto process UI changes on the main thread, since the metadata fetching executes on a background thread. If you don't, the app will crash. - Use a reference to the view controller to update the interface in the background. By using
[weak cocky]andguard let self = cocky, you ensure the update can go on without causing a retain wheel — no matter what the user does while the background process is running. - Add together
linkViewto the stack view. This code runs immediately and gives the user something to see (the URL). Then, when the background process completes, it updates the view with the rich metadata.
Build and run and spin the bike to run into the link previews in action!

Some of the previews take quite a while to load, particularly ones that include video links. Only there's nothing that tells the user the preview is loading, so they have footling incentive to stick around. You'll ready that next.
Adding an Activity Indicator
To meliorate the user experience when waiting for rich links to load, you'll add an activeness indicator below the link view.
To practise that, you'll use UIActivityIndicatorView. Take a look at SpinViewController.swift and detect information technology already has a property chosen activityIndicator. You add this property to stackView at the finish of viewDidLoad().
Start animating activityIndicator by adding this line at the beginning of spin(_:):
activityIndicator.startAnimating() Adjacent, replace the block of lawmaking for fetching the metadata with this:
provider.startFetchingMetadata(for: url) { [weak cocky] metadata, error in baby-sit permit cocky = cocky else { return } guard let metadata = metadata, error == nada else { self.activityIndicator.stopAnimating() return } DispatchQueue.main.async { [weak self] in baby-sit let cocky = self else { return } self.linkView.metadata = metadata self.activityIndicator.stopAnimating() } } Afterward unwrapping a couple optional values, this code tells the main queue to update the user interface past stopping the animation and setting the metadata on the linkView.
Build and run to come across how much a unproblematic activity indicator adds to the experience!

Handling Errors
Thinking further about the user experience, it'd be nice if you let your users know when an fault occurs, so they don't keep spinning the bike in vain.
LPError defines all the errors that can occur if fetching the metadata fails:
- .cancelled: The customer cancels the fetch.
- .failed: The fetch fails.
- .timedOut: The fetch takes longer than allowed.
- .unknown: The fetch fails for an unknown reason.
If the fetch fails, you'll testify the user why. To do this, yous'll use errorLabel in stackView. It starts subconscious but you'll unhide it and assign it some sensible text based on the error you receive.
Handling Errors: Error Messages
Go to LPError+Extension.swift and replace LPError with this:
extension LPError { var prettyString: String { switch self.code { case .metadataFetchCancelled: return "Metadata fetch cancelled." case .metadataFetchFailed: return "Metadata fetch failed." case .metadataFetchTimedOut: return "Metadata fetch timed out." case .unknown: return "Metadata fetch unknown." @unknown default: render "Metadata fetch unknown." } } } This extension creates a human-readable fault string for the different LPErrors.
Now go back to SpinViewController.swift and add this at the top of spin(_:):
errorLabel.isHidden = truthful This clears out the mistake when the user taps spinButton.
Adjacent, update the fetch block to show the mistake like this:
baby-sit let metadata = metadata, error == zero else { if allow fault = error as? LPError { DispatchQueue.chief.async { [weak self] in guard let self = self else { return } self.activityIndicator.stopAnimating() self.errorLabel.text = error.prettyString self.errorLabel.isHidden = false } } return } In the lawmaking above, you cheque for any errors. If one exists, you update the UI on the principal thread to cease the activeness indicator and then display the mistake to the user.
Unfortunately, you can't exam this with the current setup. So, add this to spin(_:), right after the new provider instance:
provider.timeout = i This volition trigger an error message when any of the links accept longer than one 2nd to load. Build and run to run into this:

Y'all set timeout to ane to exam the error message. Bump it upwardly to v now to allow a more reasonable amount of time for these rich previews to load:
provider.timeout = 5 Note: The default timeout is 30 seconds.
Handling Errors: Cancel Fetch
Your users don't know the fetch will time out at five seconds, and they might non desire to wait longer than two. If it's taking that long, they'd rather cancel the fetch. Y'all'll give them that pick adjacent.
Within the implementation of spin(_:), add this right under errorLabel.isHidden = true:
guard !activityIndicator.isAnimating else { cancel() return } spinButton.setTitle("Abolish", for: .normal) First, you make sure activityIndicator isn't spinning. But if it is, yous know:
- The user tapped the Spin the Wheel version of the button. This started the fetch and set
activityIndicator.isAnimatingtotrue. - The user likewise tapped the Cancel version of the push button because they decided to bond on the fetch.
If and then, you phone call cancel() and return.
Otherwise, if activityIndicator isn't spinning, you know the user only tapped the Spin the Wheel version of the button. Then, before you kick off the fetch, you modify the button title to Abolish, in case they want to cancel the fetch later.
At this signal, cancel() doesn't practise anything. You lot'll set up that next. Replace it with this:
private func cancel() { provider.cancel() provider = LPMetadataProvider() resetViews() } Here, you showtime call abolish() on the provider itself. Then you create a new provider example and call resetViews.
But resetViews() doesn't practice anything withal either. Fix that by replacing it with this:
private func resetViews() { activityIndicator.stopAnimating() spinButton.setTitle("Spin the Wheel", for: .normal) } In the lawmaking higher up, you terminate the activity indicator and gear up the title for spinButton back to "Spin the Cycle":
Also, to get this aforementioned functionality in provider.startFetchingMetadata, supervene upon the 2 instances of self.activityIndicator.stopAnimating() with cocky.resetViews():
self.resetViews() Now if you encounter an mistake or the preview loads, you lot'll stop the action indicator and reset the title of spinButton to "Spin the Bicycle".
Build and run. Make sure you tin cancel the asking and that errorLabel shows the right issue.

Storing the Metadata
Information technology tin can get a bit tedious to lookout man these links load, particularly if you become the same consequence dorsum more than once. To speed upward the procedure, you tin cache the metadata. This is a common tactic because spider web page metadata doesn't alter very ofttimes.
And estimate what? You're in luck. LPLinkMetadata is serializable by default, which makes caching it a cakewalk. It also conforms to NSSecureCoding, which you lot'll need to keep in heed when archiving. You tin can acquire about NSSecureCoding in this tutorial.
Storing the Metadata: Cache and Remember
Become to MetadataCache.swift and add these methods to the top of MetadataCache:
static func enshroud(metadata: LPLinkMetadata) { // Check if the metadata already exists for this URL practice { guard call up(urlString: metadata.url!.absoluteString) == nil else { return } // Transform the metadata to a Data object and // set requiringSecureCoding to truthful let information = try NSKeyedArchiver.archivedData( withRootObject: metadata, requiringSecureCoding: true) // Relieve to user defaults UserDefaults.standard.setValue(data, forKey: metadata.url!.absoluteString) } catch let error { print("Error when caching: \(error.localizedDescription)") } } static func think(urlString: String) -> LPLinkMetadata? { do { // Check if data exists for a particular url string guard allow data = UserDefaults.standard.object(forKey: urlString) equally? Information, // Ensure that it can be transformed to an LPLinkMetadata object let metadata = try NSKeyedUnarchiver.unarchivedObject( ofClass: LPLinkMetadata.self, from: data) else { return nada } return metadata } take hold of let error { print("Error when caching: \(mistake.localizedDescription)") return nil } } Here, you're using NSKeyedArchiver and NSKeyedUnarchiver to transform LPLinkMetadata into or from Data. You use UserDefaults to store and retrieve it.
Notation: UserDefaults is a database included with iOS that you can employ with very minimal setup. Data stored in UserDefaults persists on difficult drive storage fifty-fifty after the user quits your app.
Storing the Metadata: Refactor
Hop back to SpinViewController.swift.
spin(_:) is getting a little long. Refactor information technology by extracting the metadata fetching into a new method called fetchMetadata(for:). Add this code after resetViews():
private func fetchMetadata(for url: URL) { // 1. Cheque if the metadata exists if let existingMetadata = MetadataCache.retrieve(urlString: url.absoluteString) { linkView = LPLinkView(metadata: existingMetadata) resetViews() } else { // 2. If it doesn't start the fetch provider.startFetchingMetadata(for: url) { [weak cocky] metadata, error in guard let self = self else { return } guard let metadata = metadata, fault == nil else { if allow error = error as? LPError { DispatchQueue.main.async { [weak self] in guard permit self = self else { return } self.errorLabel.text = error.prettyString cocky.errorLabel.isHidden = imitation cocky.resetViews() } } render } // 3. And cache the new metadata once y'all accept it MetadataCache.cache(metadata: metadata) // 4. Use the metadata DispatchQueue.primary.async { [weak cocky] in baby-sit let self = self else { return } cocky.linkView.metadata = metadata self.resetViews() } } } } In this new method, you not only extract the metadata fetching, you as well add the following functionality:
- Render
linkViewand reset the views to normal if metadata exists. - Commencement the fetch if metadata doesn't exist.
- Enshroud the results of the fetch.
Next, supervene upon provider.startFetchingMetadata() with a call to your new method. When you lot're washed, y'all'll have the single line calling fetchMetadata() between linkView and stackView:
linkView = LPLinkView(url: url) // Replace the prefetching functionality fetchMetadata(for: url) stackView.insertArrangedSubview(linkView, at: 0) Build and run to observe how fast your links load. Keep tapping Spin the Wheel until you get a link that has been cached. Find that your links volition load immediately if y'all've seen them earlier!

What's the point of finding all these great tutorials if you lot can't share them with your friends though? Yous'll fix that side by side.
Sharing Links
The LinkPresentation framework has a cool protocol, UIActivityItemSource, which you lot can use to pass LPLinkMetadata direct to the share sail.
That means that instead of reaching out to the server and waiting for the link to load the title and icon asynchronously in the share sail, you tin pre-populate it with the metadata you already fetched.

Now your users will see a rich preview immediately. Information technology'south the little things that count!

Sharing Links: UIActivityItemSource
Commencement, go along track of the metadata by adding a new property to SpinViewController right beneath linkView:
private var currentMetadata: LPLinkMetadata? Next, assign the value to currentMetadata in fetchMetadata(for:).
Add this line within of the first if let argument in fetchMetadata(for:):
currentMetadata = existingMetadata And add together this line correct before you cache the metadata, preceding the line, MetadataCache.cache(metadata: metadata):
self.currentMetadata = metadata Now, to make use of the new LinkPresentation functionality, you lot accept to make SpinViewController conform to UIActivityItemSource.
Add together this extension outside SpinViewController, after the endmost curly brace:
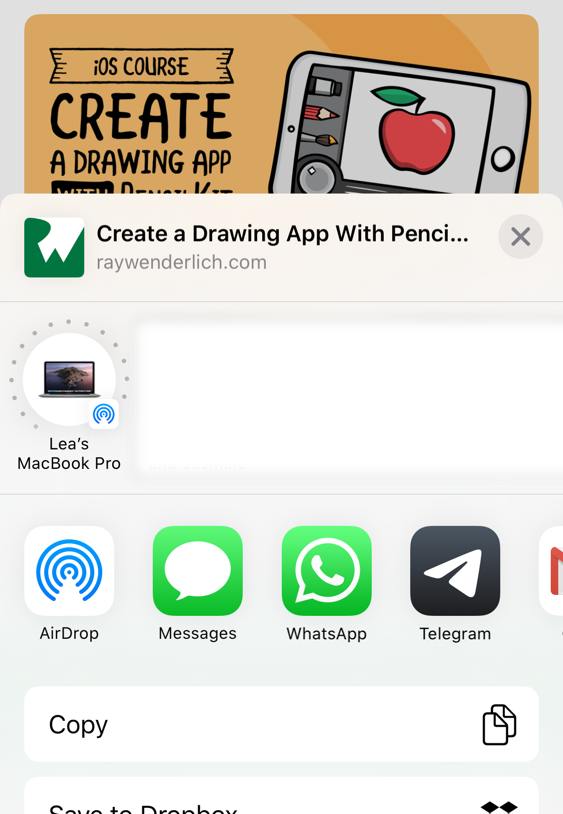
extension SpinViewController: UIActivityItemSource { // i. Required function returning a placeholder func activityViewControllerPlaceholderItem( _ activityViewController: UIActivityViewController ) -> Any { render "website.com" } // 2. Required part that returns the actual activeness particular func activityViewController( _ activityViewController: UIActivityViewController, itemForActivityType activityType: UIActivity.ActivityType? ) -> Any? { return currentMetadata?.originalURL } // 3. The metadata that the share sheet automatically picks upward func activityViewControllerLinkMetadata( _ activityViewController: UIActivityViewController ) -> LPLinkMetadata? { render currentMetadata } } Conforming to UIActivityItemSource requires you to implement iii methods:
- The placeholder method should return something close to the real data you intend to show in the Bailiwick field of your activeness detail. Withal, it does not have to incorporate real data and it should render as fast as possible. You lot'll update information technology when the real data finishes loading. For now, a unproblematic text string is sufficient.
- The
originalURLofcurrentMetadataallows the view to figure out what type of information it volition display.Note: You must return the
originalURLproperty of the metadata because it contains type data that wouldn't exist if yous merely render a newURL()with the same cord. This is easy to get wrong and can create bugs that are hard to track downwardly. - Finally,
activityViewControllerLinkMetadata(_:)is where the existent magic happens when you extract all the juicy details fromcurrentMetadata.
Sharing Links: View Update
To display this in the UI, you'll add a share button below the link view once the preview loads. The starter project provides a whole stack view with two activeness buttons on SpinViewController; you merely have to show it!

The view to show is actionsStackView. When the link metadata is loading, you hide the view. Once the preview is loaded, y'all show it.
Add this line under activityIndicator.startAnimating() within spin(_:):
actionsStackView.isHidden = true And unhide it later by adding this to the finish of resetViews(), earlier the closing curly brace:
actionsStackView.isHidden = simulated Next, replace share(:) with this:
@IBAction func share(_ sender: Whatever) { guard currentMetadata != nil else { return } permit activityController = UIActivityViewController( activityItems: [self], applicationActivities: zilch) present(activityController, blithe: truthful, completion: nil) } In the code in a higher place, you:
- Cheque if
currentMetadataexists. If it does, you create an instance ofUIActivityViewController. - Pass it
[self]every bitactivityItems. This is the important chip as it tells the activity controller to look at howSpinViewControllerconforms toUIActivityItemSource.
Build and run and tap the share button to see how smooth it is!
Note: If yous want to swap the icon that appears in the sail preview, you can utilize code like this in fetchMetadata(for:) correct earlier MetadataCache.cache(metadata: metadata):
if let imageProvider = metadata.imageProvider { metadata.iconProvider = imageProvider } This swaps out iconProvider for imageProvider.
Saving Favorites
Lastly, you want to salvage the tutorials y'all come beyond, because, hey, you might never see them again!
Next to the Share push button y'all implemented in the previous section, there's too a Save button.
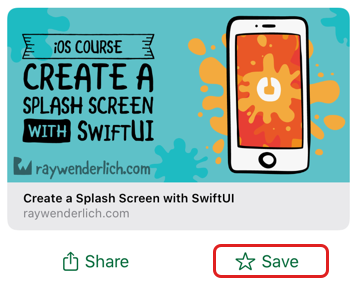
You'll store the tutorials the user wants to save under a special key in UserDefaults called savedURLs and brandish all the tutorials every bit link previews in the Saved tab in a stack view.
Become to MetadataCache.swift and add this underneath your current methods, right earlier the closing curly brace:
// ane static var savedURLs: [Cord] { UserDefaults.standard.object(forKey: "SavedURLs") as? [String] ?? [] } // 2 static func addToSaved(metadata: LPLinkMetadata) { guard var links = UserDefaults.standard .object(forKey: "SavedURLs") as? [String] else { UserDefaults.standard.set([metadata.url!.absoluteString], forKey: "SavedURLs") render } guard !links.contains(metadata.url!.absoluteString) else { return } links.append(metadata.url!.absoluteString) UserDefaults.standard.set(links, forKey: "SavedURLs") } In the code above, you:
- Make a new property,
savedURLs, which returns the array stored at the SavedURLs key inUserDefaults. - Create
addToSaved(metadata:)that you can call to bank check if a URL already exists in theSavedURLsarray inUserDefaultsand add it to the assortment if information technology does not.
Next, become back to SpinViewController.swift and replace save(_:) with this:
@IBAction func salvage(_ sender: Any) { guard allow metadata = currentMetadata else { render } MetadataCache.addToSaved(metadata: metadata) errorLabel.text = "Successfully saved!" errorLabel.isHidden = false } In the code above, yous cheque for metadata. If any exists, y'all call addToSaved(metadata:) and notify the user of the success through errorLabel.
At present that yous're successfully saving your favorite URLs, information technology'southward fourth dimension to display the links.
Switch over to SavedViewController.swift and replace loadList() with this:
private func loadList() { // ane stackView.arrangedSubviews.forEach { $0.removeFromSuperview() } // 2 allow links = MetadataCache.savedURLs let metadata = links.compactMap { MetadataCache.retrieve(urlString: $0) } // 3 metadata.forEach { metadata in let linkView = LPLinkView(metadata: metadata) stackView.addArrangedSubview(linkView) } } In the office above, you:
- Remove all the link preview subviews from
stackViewthen it's completely empty. - Grab all the links and convert them to
LPLinkMetadataobjects withretrieve(urlString:). - Add together all the subviews to
stackView.
Build and run. Save a couple of the tutorials, and see them announced on the Saved tab of the app!

Using UIStackView Versus UITableView
Yous're using UIStackView to show these link previews instead of UITableView. Tabular array views seem like the obvious choice to display information in a listing but they're not the way to become with link presentations. There are 2 big reasons for this:
- Sizing: If you follow Apple's advice and telephone call
sizeToFit()on the link preview intableView(_:cellForRowAt:), you'll find the previews don't announced. Y'all could get them to appear with Auto Layout constraints on your custom cell or by giving them a specificCGSize, but read on earlier you try this. - Memory: Fifty-fifty if you can get your previews to appear, you accept another issue:
LPLinkViewsin tabular array views cause huge retentivity leaks. They can get as high as 10GB when scrolling! Have a look at the retentivity load below:
With a retention leak similar that, your app will crash and the one-star reviews volition start flying. Best to stay away from table views for link presentations!
Time to examination your app i more time. Build and run and tap one of the links in the Saved tab. Safari volition open and y'all'll run across your chosen tutorial displayed every bit a web page. Practiced task!
Where to Get From Hither?
Congrats! You've just learned most of what in that location is to know nearly link presentations!
Download the terminal project using the Download Materials button at the top or bottom of this page.
To learn more virtually what Apple tree has to say on the topic, watch the WWDC 2019 videos on Embedding and Sharing Visually Rich Links and Ensuring Beautiful Rich Links.
If yous want to have a closer look at the framework, read the documentation on the LinkPresentation framework.
And if you're curious how to make links even more powerful and useful, check out our Universal Linking tutorial!
If you have any questions or comments, delight join the forum discussion beneath.
Source: https://www.raywenderlich.com/7565482-visually-rich-links-tutorial-for-ios-image-thumbnails
0 Response to "Activityindicator Not Showing Ios Shows Once Then Never Again"
Post a Comment